When I first saw chipboard, I was totally clueless as to how one went about covering it with designer papers. So here's just a quick little tutorial of how I do it.
First, you'll need these supplies:
Chipboard, Sanding Block or Sand Paper, White Glue, Paint Brush (usable with glue), Pencil, Hobby Blade, Cutting Mat, and Scissors.

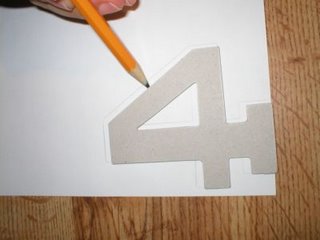
Start by flipping the designer paper over and trace the desired chipboard piece backwards.
After tracing around the chipboard, start to cut it out. If your piece has any center cutouts, cut those out first with the hobby blade, it just makes things easier to do this first. Then, carry on cutting around the traced image.

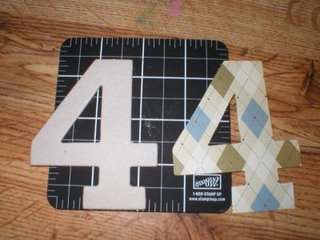
At this stage you now have a lovely cut-out designer paper duplicate of your chipboard piece. You could stop at this stage, but adhering the paper to the chipboard definitely adds a lovely bit of dimension. Just a note, the cut out piece will be slightly bigger than the chipboard (that's a good thing).
 Next, apply the white glue to the chipboard. I just swirl it around in the center of the chipboard. Don't worry if it's globby, that what we will use the paintbrush for.

Now, use the paintbrush to smoothen out the glue. At this point, you can also use the paintbrush to scrape off some of the glue, if you think you have too much.

Now, you can finally adhere the chipboard to the paper! To do this, I lay the chipboard face up, then lay the paper overtop. Then I flip the entire thing over, and make sure the chipboard is centered on the designer paper. Because we used white glue, the chipboard is slippery for a short time, so you can move it, if necessary. Let it dry.

Now, once again, you could leave it. However, sanding all along the edges will give the chipboard a lovely rounded, as well as distressed look. Take your sanding block, and go to town along the edges. For tight inside corners, I suggest using folded sandpaper, since it is more formable than a block.

There you have it! Now you have a lovely decorated piece of chipboard to use to embellish your cards, scrapbook pages and more!

posted by Natasha at
7:30 PM
|
1 comments
![]()
